Changing a drill bit sounds like it should be obvious — but if you have just picked up your first cordless drill and you are staring at the chuck wondering what to do, it is genuinely not immediately clear. Different drills use different chuck systems, and using the wrong technique can damage the chuck, strip the bit shank, or leave the bit loose enough to fly out under load. Let’s delve into your question: “how to change a drill bit?”
This guide covers how to change a drill bit in every common chuck type — keyless chucks, keyed chucks, SDS chucks, and impact driver collets — with clear step by step instructions for each.
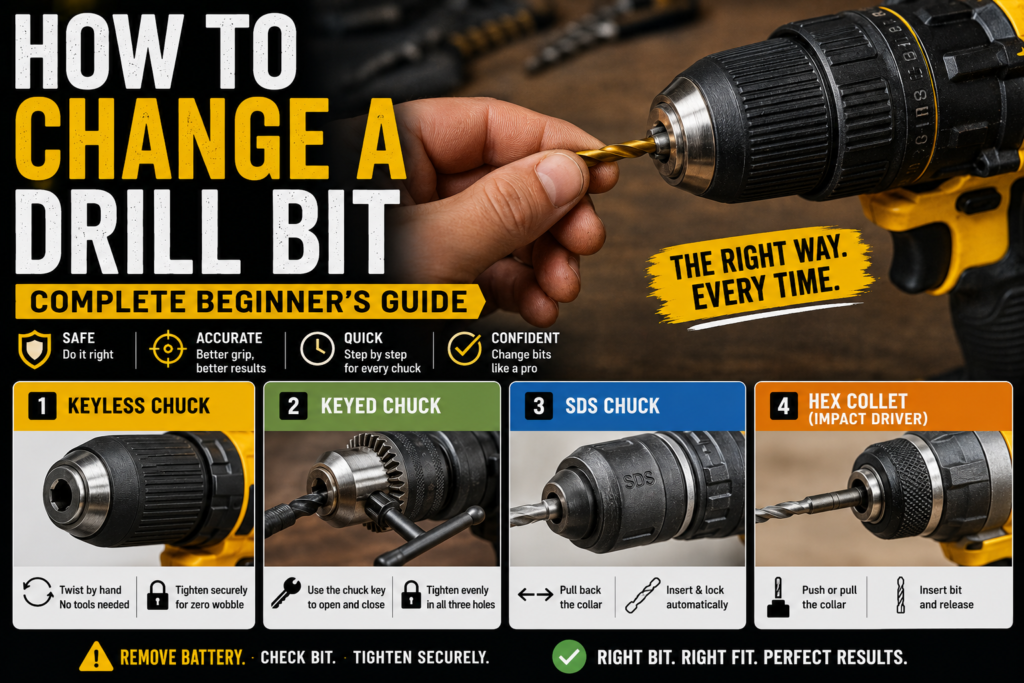
First — Identify Your Chuck Type
Before changing a bit you need to know what type of chuck your drill has. There are four common types:
| Chuck type | How to identify it | How you change bits |
|---|---|---|
| Keyless chuck | Ribbed outer ring you twist by hand — most common on modern cordless drills | Twist the outer ring by hand |
| Keyed chuck | Has small holes around the side for a chuck key — older drills and some corded models | Use the chuck key to open and close |
| SDS chuck | Smooth outer sleeve with a collar you pull back — only on SDS rotary hammer drills | Pull back the collar and insert or remove |
| Hex collet (impact driver) | Small cylindrical chuck with a push-release collar — on impact drivers only | Push the collar forward or pull back to release |
Safety First — Always Do This Before Changing Any Bit
Before changing a drill bit always:
- Remove the battery or unplug the drill from power. Changing a bit in a live drill is a serious injury risk — the trigger can be accidentally pressed while your fingers are near the chuck.
- Wait for the bit to cool if you have been drilling. Bits get hot during use — particularly after drilling metal or masonry. A hot bit can cause burns when handled.
- Check the bit for damage before inserting. A bent, cracked, or chipped bit should be discarded, not reused.
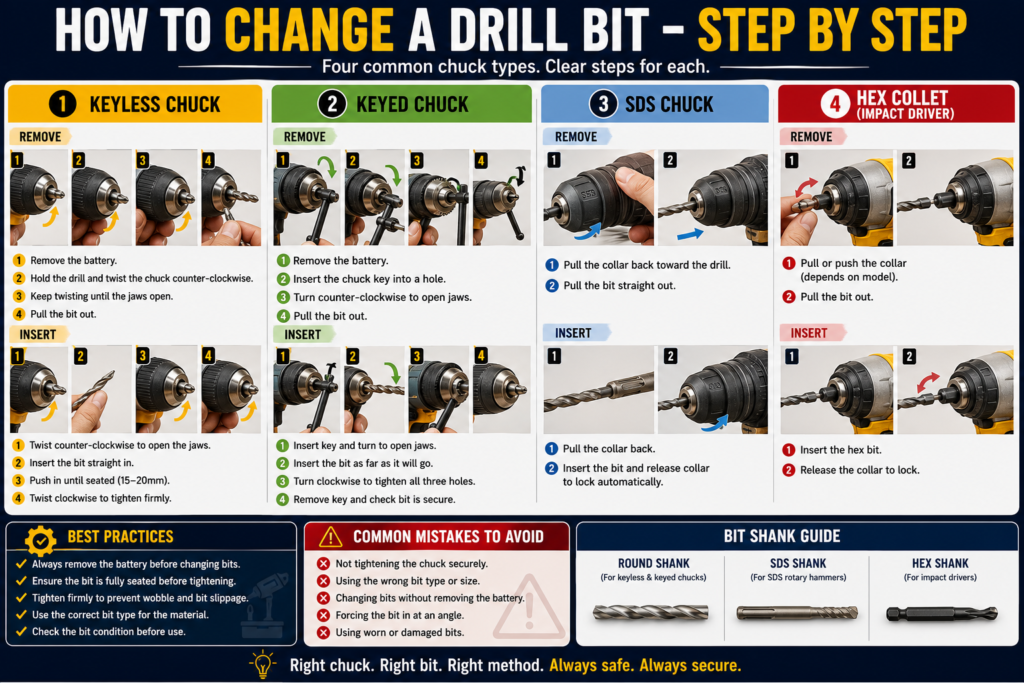
Method 1 — Keyless Chuck (Most Common)
The keyless chuck is on almost all modern cordless drills from brands like DeWalt, Makita, Milwaukee, and Ryobi. It has a ribbed or textured outer sleeve that you twist by hand to open and close the three jaws inside.
To Remove the Current Bit
- Remove the battery from the drill
- Hold the drill body firmly in one hand
- Grip the outer chuck sleeve with your other hand
- Twist the sleeve counter-clockwise (anti-clockwise) — looking from the front of the drill
- The jaws inside will open and the bit will loosen and slide out
- Continue twisting until the bit is fully free
To Insert a New Bit
- Open the chuck jaws by twisting counter-clockwise until the opening is wider than the bit shank
- Insert the bit shank straight into the centre of the chuck opening
- Push the bit in until it is fully seated — typically 15 to 20mm of shank inside the chuck
- Twist the outer sleeve clockwise to close the jaws around the shank
- Tighten firmly — grip the sleeve in both hands and give a firm final twist. The jaws should grip the bit without any wobble.
- Reinsert the battery
Common Mistake — Not Tightening Enough
The most common keyless chuck mistake is not tightening the chuck fully. A loosely fitted bit wobbles under load, produces poor holes, wears out faster, and can fly out dangerously if it comes completely loose during drilling. After inserting a bit always do a final tighten with both hands on the chuck sleeve and check there is zero wobble before starting.
Method 2 — Keyed Chuck
Keyed chucks are found on older cordless drills, many corded drills, and some drill presses. They use a toothed key that fits into holes around the chuck body to ratchet the jaws open and closed. The key is usually stored in a clip on the drill cord or stored magnetically on the drill body.
To Remove the Current Bit
- Remove power from the drill
- Locate the chuck key — it has a small gear at one end and a handle at the other
- Insert the gear end of the key into one of the holes in the chuck body
- Turn the key counter-clockwise — you will hear and feel the ratchet mechanism engage
- Continue turning until the jaws open fully and the bit is released
To Insert a New Bit
- Open the jaws fully by turning the key counter-clockwise
- Insert the bit shank into the centre of the chuck
- Turn the key clockwise to close the jaws around the shank
- Tighten firmly — move the key to each hole position (typically 3 positions at 120 degrees apart) and tighten from each position for even clamping pressure
- The bit should have zero wobble when fully tightened
What to Do if You Lose the Chuck Key
Chuck keys are a standard size for most common chucks — the key size is typically stamped on the chuck body (e.g. “KEY 3/8-24”). A replacement key is available at any hardware store for a few pounds. In an emergency a keyless chuck conversion kit can replace the keyed chuck entirely, though this requires removing the old chuck first.
Method 3 — SDS Chuck
SDS chucks are only found on SDS rotary hammer drills. They work completely differently from keyless and keyed chucks — there are no jaws. Instead the SDS bit shank has slots that lock into the chuck mechanism, allowing the bit to slide back and forth for hammering while remaining rotationally locked.
SDS bits are not compatible with standard chucks and vice versa. For more on SDS drills and when you need one, read our What Is a Hammer Drill guide.
To Remove an SDS Bit
- Remove power from the drill
- Pull the outer collar of the SDS chuck back toward the drill body and hold it there
- Pull the bit straight out of the chuck while holding the collar back
- Release the collar once the bit is clear
To Insert an SDS Bit
- Pull the outer collar back toward the drill body
- Insert the SDS bit shank into the chuck opening — align the slots on the bit with the slots in the chuck
- Push the bit in firmly until you feel and hear it click into place
- Release the collar
- Pull the bit gently to confirm it is locked — it should not pull straight out but should slide back and forth slightly (this is normal for SDS)
Method 4 — Hex Collet (Impact Driver)
Impact drivers use a 1/4 inch hex collet — a quick-release system that accepts only bits and accessories with a 1/4 inch hexagonal shank. Bit changes are faster than any chuck system — typically under two seconds. Only hex-shank bits fit an impact driver collet. Standard round-shank drill bits do not fit without an adapter.
For more on what an impact driver can and cannot do, read our Impact Driver vs Drill guide.
To Remove a Bit from an Impact Driver
- Remove the battery
- Pull the outer collar of the collet forward (toward the bit tip) — or on some models pull it back toward the driver body. Check which direction releases your specific model.
- Hold the collar in the released position
- Pull the bit straight out
- Release the collar
To Insert a Bit into an Impact Driver
- Pull the collet collar to the release position
- Push the hex shank of the bit straight into the collet
- Release the collar — it springs back and locks the bit in place
- Pull the bit gently to confirm it is locked — it should not pull out without pulling the collar again
Choosing the Right Bit for the Job
Changing the bit is straightforward — choosing the right bit for the material is where most beginners go wrong. Use the wrong bit type and you will damage the bit, the material, or both.
| Material | Correct bit type | Never use |
|---|---|---|
| Softwood / hardwood | HSS twist or brad point | Masonry bits |
| Steel / metal | HSS or cobalt twist bit | Wood or masonry bits |
| Brick / concrete | Carbide masonry bit | HSS bits — will be destroyed instantly |
| Ceramic tile | Diamond tile bit | Any other type — will crack tile |
For a complete guide to every drill bit type and what each one is designed for, read our Drill Bit Types guide. For understanding bit sizes and conversions between metric and imperial, read our Drill Bit Size Chart.
🔧 Chuck Type Identifier — Find Your Chuck
Not sure what chuck type your drill has? Answer two quick questions to identify it and get the right bit-changing instructions.
Frequently Asked Questions
Why does my drill bit keep slipping or falling out?
The chuck is not tightened fully. On a keyless chuck grip the sleeve firmly in both hands and give a firm final clockwise twist — most people under-tighten on the first attempt. On a keyed chuck make sure you have tightened from all three key positions around the chuck body. If the bit continues to slip even when fully tightened the chuck jaws may be worn and the chuck may need replacing.
Can I use any drill bit in any drill?
No. Round-shank bits only fit standard keyless and keyed chucks. SDS bits only fit SDS chucks. Hex-shank bits fit impact driver collets directly and also fit standard chucks. Check the shank type before buying bits — the wrong shank type will not fit, or will fit loosely and be unsafe. For full detail on bit types and compatibility, read our Drill Bit Types guide.
How do I know which direction to turn the chuck to loosen it?
Counter-clockwise (anti-clockwise) loosens — clockwise tightens. This is the standard direction for all keyless and keyed chucks. A simple memory aid: think of a standard screw — right to tighten, left to loosen. The chuck works the same way. Looking at the front of the drill, turn left to loosen and right to tighten.
My keyless chuck is very stiff and hard to turn — is this normal?
A new chuck can be stiff initially and will loosen with use. If a previously easy chuck has become very stiff, it may have debris inside or the mechanism may be damaged. Try cleaning around the chuck jaws with compressed air. Do not lubricate the chuck interior with oil — oil attracts sawdust and metal particles that clog the mechanism over time. If the chuck is damaged it can be replaced — most drill chucks unscrew from the spindle once the centre screw is removed.
What is the difference between a keyless and keyed chuck in terms of grip strength?
A properly tightened keyed chuck typically grips more firmly than a keyless chuck because the mechanical advantage of the key allows more clamping force than hand tightening. For most home and professional use this difference is not significant. For heavy-duty sustained drilling — particularly large holes in hardwood or metal — a keyed chuck maintains its grip better under load. Most professional drills now use high-quality keyless chucks that approach keyed chuck grip strength.
Can I put a larger bit in my drill than the chuck is rated for?
No. Every chuck has a maximum jaw opening — typically 10mm (3/8 inch) or 13mm (1/2 inch) for most cordless drills. Forcing an oversized bit shank into a chuck damages the jaws permanently. Check your drill’s chuck capacity in the specification — it is usually printed on the chuck body or in the manual. For large holes use the correct size spade bit, hole saw, or Forstner bit that fits within the chuck’s maximum capacity.