Drilling into brick looks straightforward — point the drill at the wall and push. In practice, doing it wrong cracks the brick face, strips the bit, strips the wall plug, or leaves you with a hole that is the wrong size, wrong depth, or in completely the wrong position. So, how to drill into brick correctly? Getting it right requires the correct bit, the correct drill setting, and a technique that takes about thirty seconds to learn.
This guide walks through the complete process from marking the hole to inserting the fixing — including how to handle the most common problems that come up along the way.
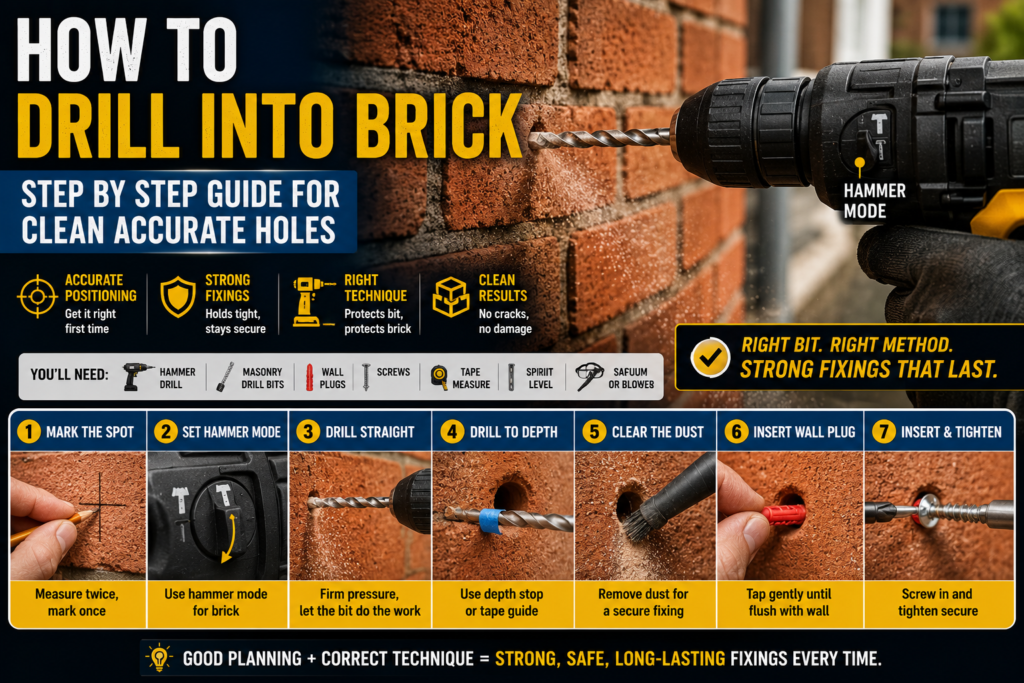
What You Need Before You Start
Tools
- Hammer drill — a standard cordless drill with hammer mode, or an SDS rotary hammer for larger holes. A standard drill without hammer mode works in soft brick and mortar joints but is slow and hard on bits in harder brick.
- Masonry drill bits — carbide-tipped bits in the correct size for your wall plug. The most common sizes for home fixing tasks are 5mm, 6mm, 8mm, and 10mm.
- Tape measure and pencil — for marking the exact hole position
- Spirit level — for marking multiple holes that need to be level with each other
- Depth stop or tape on the bit — to control how deep the hole goes
- Vacuum or bulb blower — for clearing brick dust from the hole before inserting the plug
Materials
- Wall plugs (rawl plugs) in the correct size for your screw and drill bit
- Screws of the correct length and gauge for the load you are fixing
Choosing the Right Drill Bit Size
The most common mistake in wall fixing is using the wrong size bit for the wall plug. The bit must match the plug — not the screw, not the nearest size you have in the set. Check the packaging on your wall plugs — the correct drill bit size is printed on every pack.
| Wall plug colour | Drill bit size | Screw size | Typical use |
|---|---|---|---|
| Yellow | 5mm | No. 4–6 | Light loads — pictures, hooks |
| Red | 6mm | No. 8 | Medium loads — shelving, mirrors |
| Brown | 7mm | No. 10 | Medium-heavy loads |
| Blue | 10mm | No. 12–14 | Heavy loads — radiators, cabinets, TV brackets |
For understanding the full range of masonry bit types and what each one cuts, read our Concrete vs Masonry Drill Bit guide.
Step by Step — How to Drill Into Brick
To address your question, “how to drill into brick,” proceed with following steps:
Step 1 — Mark the Hole Position Precisely
Use a pencil and tape measure to mark exactly where the hole needs to go. For a single fixing a pencil cross marks the centre point. For multiple fixings that need to be level — shelf brackets, for example — use a spirit level to draw a level line first, then mark each hole position along that line.
If you are drilling near electrical cables or water pipes, use a cable and pipe detector before marking. In a standard UK brick house, cables typically run vertically from switches and sockets and horizontally between them — avoid these zones. According to HSE guidance, striking a buried cable is one of the most common causes of serious electrical injury during home improvement work.
Step 2 — Set Your Drill to Hammer Mode
Find the mode selector on your drill — it is typically a ring or switch near the chuck marked with a drill icon and a hammer icon. Switch to hammer mode. Without hammer mode your bit will grind on the brick surface without cutting effectively, generating heat that destroys the carbide tip rapidly.
Set the drill speed to medium. Brick does not require the absolute slowest speed like concrete does, but high speed generates unnecessary heat and reduces bit life without improving drilling speed. Gear 1 on most drills is appropriate.
Set the clutch to the highest drilling setting or switch to drill-through mode (the drill bit icon on the clutch ring) — this bypasses the clutch entirely for drilling.
Step 3 — Set the Correct Hole Depth
Your wall plug needs to sit fully inside the wall with no part of it proud of the surface. A good rule is to make the hole 5mm to 10mm deeper than the wall plug length to give space for dust at the bottom of the hole.
Set your depth using one of these methods:
- Depth stop rod — most hammer drills have a depth stop rod that screws into the side of the chuck housing. Set it to the required depth and tighten.
- Tape on the bit — wrap a small piece of masking tape around the bit at the required depth. When the tape reaches the wall surface, stop drilling.
Step 4 — Start the Hole
Position the bit tip on your pencil mark. Hold the drill perpendicular to the wall — not angled up, down, or sideways. An angled hole causes the wall plug to sit at an angle, reducing its grip significantly.
Start the drill at low speed before applying forward pressure. This lets the carbide tip begin to bite into the surface before the full hammer action engages. Once the bit has started the hole — after the first few millimetres — increase to medium speed and apply steady forward pressure.
Step 5 — Drill to Depth
Apply steady, consistent pressure and let the drill do the work. Do not force the drill — if progress is very slow, the bit tip may be worn or you may have hit a harder aggregate particle in the brick. If the drill completely stalls, withdraw the bit, clear the dust, and try again with fresh pressure.
Withdraw the bit every 10 to 15 seconds to clear brick dust from the flutes. Clogged flutes reduce cutting efficiency and increase heat. For deeper holes, withdraw completely and blow or vacuum out the hole before continuing.
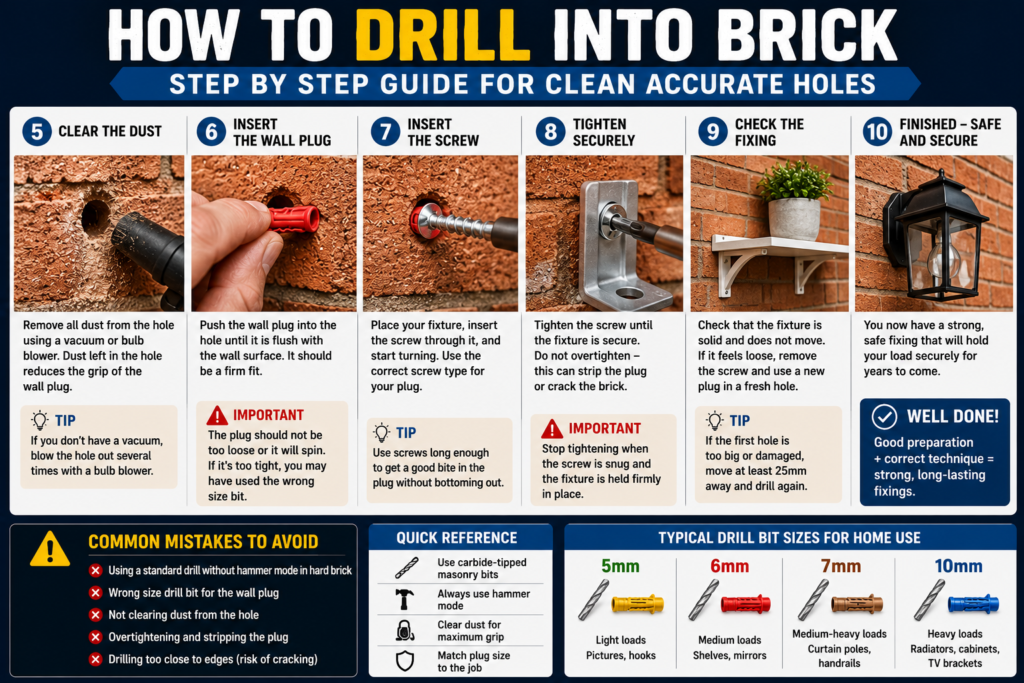
Step 6 — Clear the Hole
Before inserting the wall plug, clear brick dust from the hole completely. A bulb blower or a can of compressed air works best. Alternatively blow through a drinking straw into the hole — hold your eyes closed. A hole full of brick dust prevents the wall plug from fully expanding and significantly reduces the grip of the fixing.
Step 7 — Insert the Wall Plug
Push the wall plug into the hole by hand. It should be a firm push fit — if it falls straight in the hole is too large and you need a larger plug. If it will not go in at all the hole may be slightly too small — do not force it, as a split plug provides poor grip. Tap the plug gently with a hammer if needed until it sits flush with or just below the wall surface.
Step 8 — Drive the Screw
Insert the screw and drive it in with a screwdriver or drill in standard mode (not hammer mode). As the screw turns into the plug, the plug expands outward against the brick hole walls — this is what creates the grip. Stop when the screw head is tight against the surface being fixed. Do not overtighten — stripping the plug by overtightening is a common mistake that destroys the fixing completely.
Drilling Into Mortar Joints vs Brick Body
For how to drill into brick correctly you have a choice when fixing into a brick wall — drill into the brick itself or into the mortar joint between bricks. Both work, but with different characteristics:
| Location | Drilling difficulty | Fixing strength | Best for |
|---|---|---|---|
| Brick body | Harder — requires hammer mode | Stronger — denser material | Heavy fixings — radiators, TV brackets, cabinets |
| Mortar joint | Easier — softer material | Weaker — mortar can crumble | Light fixings — pictures, hooks — or when aesthetics matter |
For anything carrying significant weight always drill into the brick body rather than the mortar joint. Old mortar in particular can be soft and crumbly, making fixings unreliable.
Common Problems and How to Fix Them
The Drill Makes No Progress
Most likely causes: hammer mode not switched on, bit tip is worn, or you have hit a hard aggregate particle. Check hammer mode is active first. If the bit has been used many times and the carbide tip is visibly worn or rounded, replace it — a worn masonry bit makes almost no progress in brick. If you hit a hard spot, withdraw the bit, shift position by 2 to 3mm, and try again.
The Brick Face Cracks or Chips
This happens when drilling too close to the edge of a brick, using too much pressure at the start, or drilling at an angle. Always drill at least 20mm from the edge of a brick. Start the hole gently at low speed before applying full pressure. Keep the drill perfectly perpendicular to the wall surface at all times.
The Wall Plug Spins When Driving the Screw
The hole is too large — the plug cannot grip the walls of the hole. Solutions: use a larger wall plug that fits the hole snugly, use a frame fixing (a longer plug with a wider expansion zone), or fill the hole with fresh mortar and redrill after it sets.
The Screw Will Not Tighten Properly
The hole is too deep — the plug has been pushed too far in and the screw is not reaching the expanding section. Pack the back of the hole with a small piece of the same plug material or a fragment of the old plug, then reinsert and retry.
The Bit Gets Very Hot
You are drilling continuously without withdrawing to clear dust. Withdraw the bit every 10 to 15 seconds, allow it to cool briefly, and blow dust from the hole. Continuous drilling builds heat that rapidly destroys the carbide tip. For longer holes take more frequent breaks.
🔨 How to Drill Into Brick — Setup Checker
How to drill into brick correctly? Answer four quick questions to confirm you have the right setup before you start drilling.
Frequently Asked Questions
Can I drill into brick without a hammer drill?
Yes, but only in soft brick or mortar joints, and it is slow. A standard drill without hammer mode relies on rotation alone to grind through brick. In soft old brick this can work with a sharp carbide masonry bit and plenty of patience. In modern hard engineering brick or dense fired clay brick a standard drill makes almost no progress and rapidly overheats and destroys the bit. For any regular brick wall fixing a hammer drill is the practical minimum. Read our What Is a Hammer Drill guide for full details.
What is the difference between drilling into brick and drilling into concrete?
Brick is significantly softer than concrete and drills much more easily. The same carbide masonry bit and hammer drill that struggles with dense concrete will drill through brick quickly and easily. Concrete — particularly reinforced structural concrete — requires more powerful hammer action and is far more demanding on bits. If you can drill brick comfortably with your current setup, that does not mean the same setup will handle concrete effectively. Read our Concrete vs Masonry Bit guide for a full comparison.
How do I know if my wall is brick or something else?
Tap the wall firmly with your knuckle. A solid, dense sound with little vibration indicates brick or concrete. A hollow sound that resonates indicates a stud wall with plasterboard over timber framing. You can also use a stud finder — it will detect the absence of studs (indicating solid masonry) or their presence (indicating a timber frame). Drilling a small test hole with a masonry bit at low speed will also tell you — brick dust is red-brown, plaster dust is white, and the resistance feel is completely different.
How deep should I drill into brick?
At minimum your hole needs to be as long as the wall plug plus 10mm for dust clearance at the bottom. Most standard wall plugs are 25mm to 40mm long. For a 30mm red plug use a 40mm to 42mm hole depth. For heavy fixings using longer frame fixings — 60mm to 100mm — ensure your bit is long enough to reach full depth.
What drill setting should I use for brick?
Hammer mode on, clutch bypassed (drill-through mode), gear 1 (low speed, high torque). Medium forward pressure — not forcing, but maintaining consistent contact. Withdraw every 10 to 15 seconds for dust clearance. For understanding how drill speed and torque settings affect different materials, read our Torque vs Speed guide.
Why does the wall plug keep falling out?
The most common cause is a hole that is too large for the plug — either the wrong bit size was used or the bit wandered and widened the hole. Use the next size up wall plug, or use a frame fixing designed for oversized holes. If the mortar around the hole is crumbling, the mortar joint may be too soft and deteriorated for a standard plug — use a chemical anchor (resin fixing) which bonds directly to the surrounding material rather than relying on mechanical expansion.