A circular saw is one of the most powerful and useful tools in any workshop — but it is also one of the hardest to use accurately without practice. Freehand cuts wander. Lines drift. By the time you reach the end of a sheet of plywood you are half an inch off where you started.
The good news is that cutting perfectly straight with a circular saw is not about skill or experience. It is about setup. Use the right technique and the right guides and you will cut straight every single time regardless of how long you have been using power tools.
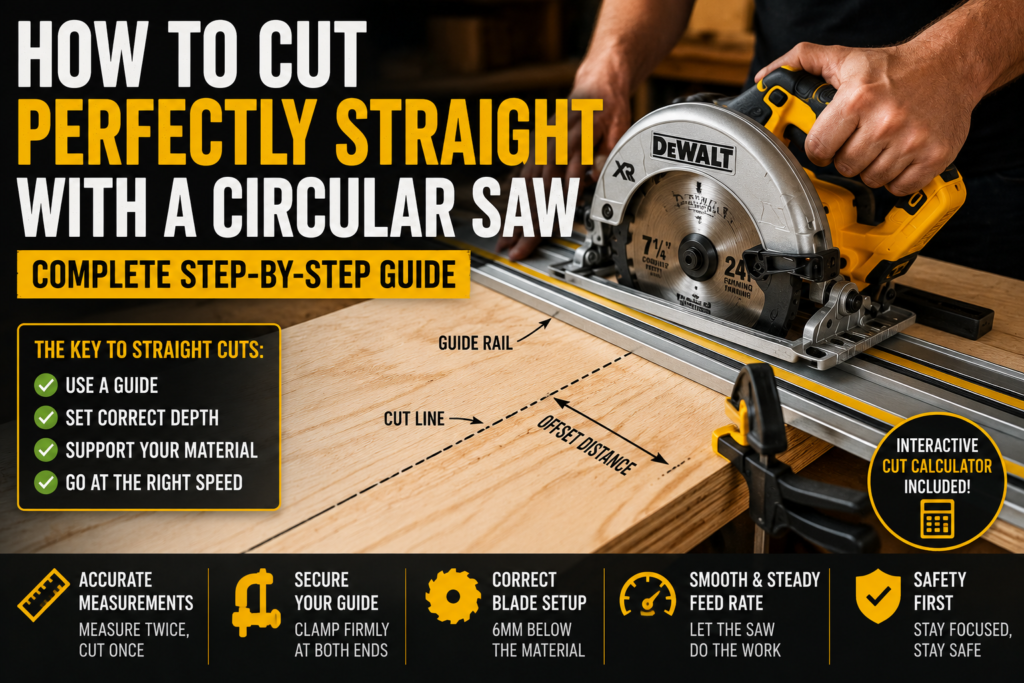
This guide covers everything — blade setup, guide methods, measuring technique, material support, and the most common mistakes that cause wandering cuts. We have also included an interactive offset calculator at the end so you can set up your guide fence accurately for any saw.
Why Circular Saw Cuts Go Wrong
Before fixing the problem it helps to understand why cuts go off line in the first place. There are four main causes:
1. Freehand cutting without a guide
The most common cause. Humans cannot maintain a perfectly straight line by eye over any distance longer than about 30 centimetres. The hand naturally drifts, the eye loses focus on the line, and small corrections compound into a wandering cut. No matter how experienced you are, freehand cuts on anything longer than a short piece of timber are unreliable.
2. Wrong blade depth
Setting blade depth too deep increases the blade’s contact with the material, creating more friction and resistance that pushes the saw off line. The correct depth is approximately 6mm below the bottom of the material — just enough for the blade to clear the cut cleanly without excessive exposure.
3. Unsupported material
A sheet of plywood balanced on two sawhorses with nothing supporting the cut zone will sag as the saw progresses. The sagging material pinches the blade causing it to bind and deflect. Proper support — close to both sides of the cut line — eliminates this problem entirely.
4. Wrong speed or feed rate
Pushing the saw too fast forces the blade to deflect sideways under load. Pushing too slowly causes the blade to heat up and wander as it exits the material. A smooth, consistent feed rate at the tool’s natural pace produces the straightest cuts.
The following tool will help you make steps for Perfectly straight cut:
Method 1 — The Straight Edge Guide (Most Versatile)
A straight edge guide is the simplest and most reliable method for straight circular saw cuts. It works for any length of cut on any material.
What you need:
- A straight piece of timber, aluminium angle, or purpose-made guide rail
- Two clamps
- A tape measure and pencil
Step by step:
- Mark your cut line clearly on the material
- Measure the distance from the edge of your circular saw’s base plate to the blade — this is your offset distance (typically 38mm to 55mm depending on your saw)
- Measure your offset distance away from your cut line toward the waste side — mark this position at both ends of the cut
- Position your straight edge guide along these marks and clamp it firmly at both ends
- Run the base plate of the saw firmly against the guide edge throughout the cut
The saw’s base plate acts as a sled along the guide edge, keeping the blade perfectly parallel to your cut line for the entire length of the cut.
Key tip: Always clamp the guide on the keep side of the material — the side you want to retain. If the guide shifts it will move into the waste, not into your finished piece.
Method 2 — Purpose-Made Guide Rail
A purpose-made guide rail system — such as those made by Festool, Makita, or DeWalt — takes the straight edge method to the next level. These rails include an anti-splinter strip, a groove that locks the saw to the rail, and rubber grips that hold the rail in position without clamping.
According to Fine Woodworking, purpose-made guide rail systems consistently produce cuts accurate to within 0.5mm over 2.4 metre lengths — matching the accuracy of a table saw for most practical applications.
Guide rails are more expensive than a clamped straight edge but significantly faster to set up for repeated cuts and more reliable for very long cuts. For anyone who regularly cuts sheet materials they are a worthwhile investment.
Method 3 — The Rip Fence Attachment
Most circular saws accept a rip fence attachment — a metal guide that clamps to the saw’s base plate and rides along the edge of the material to keep cuts parallel to the board edge at a consistent width.
Best for: Ripping timber to a consistent width along its length — cutting a 200mm strip from a board edge, for example.
Limitations: Only works when cutting parallel to a straight edge. If the material edge is not straight, the fence will follow the irregularity and the cut will not be straight.
How to use it:
- Attach the rip fence to the saw’s base plate
- Set the fence distance to match the desired cut width
- Keep the fence pressed firmly against the material edge throughout the cut
- Move at a consistent pace — do not pause mid-cut
Method 4 — Scoring the Cut Line
Before making any circular saw cut in plywood, MDF, or veneered materials, scoring the cut line with a sharp utility knife dramatically improves edge quality. The scored line severs the surface fibres before the blade reaches them, preventing the ragged tear-out that circular saw blades cause on the exit face of the cut.
How to score correctly:
- Use a steel ruler clamped along your cut line
- Draw a sharp knife along the line with firm pressure — one clean pass
- Make sure the saw blade cuts on the waste side of the score line — the blade itself removes a small amount of material (kerf width) so position the blade accordingly
Blade Setup — Getting This Right Changes Everything
Set the correct blade depth
Place the saw on the material with the blade retracted. Adjust the depth setting so the blade extends approximately 6mm below the bottom surface of the material. Lock the depth setting. This is the most commonly overlooked setup step and one of the most impactful for cut quality.
Check blade squareness
The blade should be perfectly perpendicular to the base plate for straight cuts. Use a small square against the blade (with the power disconnected) to verify. If the blade is not square adjust the bevel setting back to 0 degrees and recheck. A blade that is even 1 or 2 degrees off produces a bevelled cut edge that looks and measures incorrectly.
Use a sharp blade
A dull blade wanders. A sharp blade cuts cleanly and tracks straight with minimal sideways force. If your cuts have been drifting and you have not changed the blade recently, try a new blade before adjusting your technique. For detailed blade selection guidance read our Circular Saw Blade guide.
Material Support — The Step Most Beginners Skip
Proper material support is non-negotiable for straight cuts in sheet materials. The rule is simple: support the material on both sides of the cut line as close to the blade as practical.
For sheet materials (plywood, MDF, OSB):
- Lay the sheet on four sawhorses or a foam insulation board on the floor
- If cutting across the width, position supports about 30cm either side of the cut line
- The waste piece must also be supported so it does not fall and take the blade with it
For dimensional timber:
- Support both ends of the piece on sawhorses
- For short pieces, a single sawhorse with the work overhanging is fine
- Never hold timber in your hand while cutting — always use a sawhorse or workbench
The Offset Calculator
To use any guide rail method you need to know your saw’s offset — the exact distance from the edge of the base plate to the blade. This varies between saw models. Use the interactive calculator below to find your offset and set up your guide position correctly for any cut.
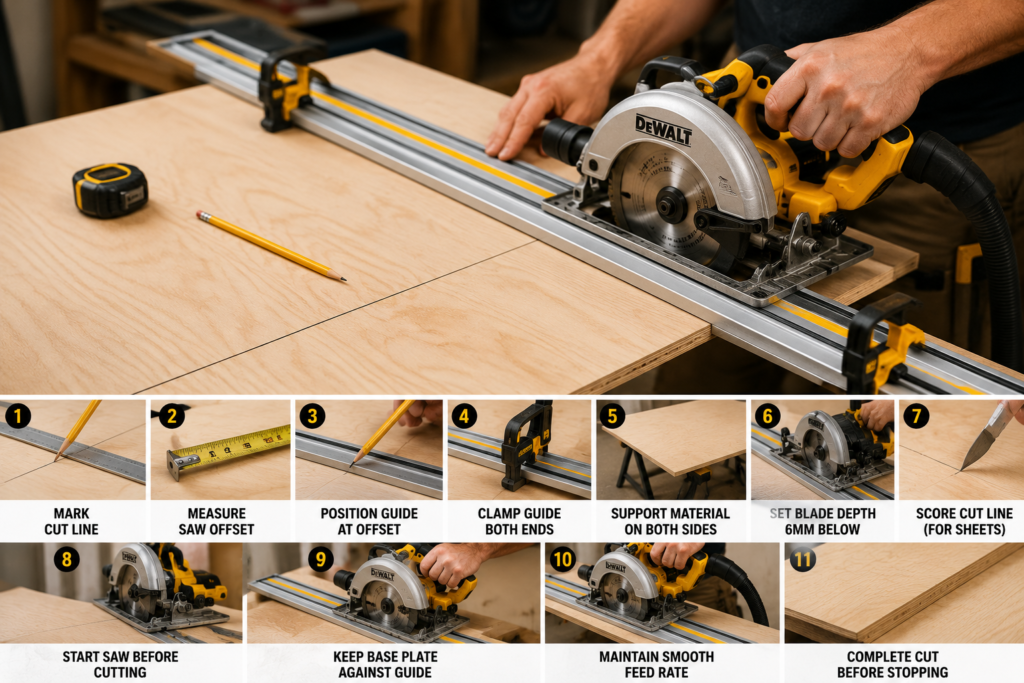
Step by Step — Making a Perfect Straight Cut
- Mark your cut line clearly with a sharp pencil and straight edge
- Measure your saw offset using the calculator above
- Position your guide at the offset distance from your cut line on the waste side
- Clamp the guide firmly at both ends — check it has not moved after clamping
- Support the material on both sides of the cut line
- Set blade depth to 6mm below the material
- Score the cut line with a knife for sheet materials
- Start the saw before the blade contacts the material — never start under load
- Begin the cut with the base plate firmly against the guide, moving smoothly forward
- Maintain consistent feed rate — not too fast, not too slow
- Complete the cut fully before releasing the trigger
Common Mistakes and How to Fix Them
| Mistake | What happens | Fix |
|---|---|---|
| Cutting freehand | Cut drifts off line | Always use a guide — no exceptions |
| Blade depth too deep | Increased friction, blade wanders | Set depth to 6mm below material only |
| Unsupported material | Blade binds, cut deflects | Support both sides of cut line |
| Guide not clamped tight enough | Guide shifts during cut | Use two clamps, check after clamping |
| Wrong offset measurement | Guide in wrong position, cut off-line | Use offset calculator, test cut on scrap first |
| Starting saw in material | Kickback risk, rough entry | Always start saw before contacting material |
| Dull blade | Saw wanders, burns material | Replace blade — do not try to push through |
| Inconsistent feed rate | Burn marks, rough edges | Move at a smooth, consistent pace |
Safety Reminders
According to OSHA power tool guidelines, circular saws are among the most common causes of serious hand and arm injuries in workshops. Always:
- Wear eye protection — blade contact with hidden fixings or knots can throw debris at speed
- Keep the blade guard in place — never remove or tie it back
- Keep hands clear of the blade path by at least 150mm on both sides
- Disconnect power before changing blades or making adjustments
- Never reach under the material to support it near the blade
- Let the blade stop completely before setting the saw down
For a full review of the DeWalt 20V circular saw including cutting depth at different bevel angles, read our DeWalt Circular Saw Review. For understanding how torque and speed affect cutting performance, read our Torque vs Speed guide.
Frequently Asked Questions
How do I find the offset distance for my specific saw?
Place your saw on a flat surface and measure from the left edge of the base plate to the near side of the blade (the side the blade cuts on). This is your offset. Use the calculator above to do this accurately. Most saws have an offset between 35mm and 60mm. Write this number somewhere convenient — you will use it every time you set up a guide.
Can I use a circular saw to cut plywood accurately?
Yes — with a guide rail or clamped straight edge a circular saw cuts plywood as accurately as a table saw for most practical purposes. The key is proper setup — guide clamped firmly, blade depth set correctly, material fully supported, and a fine-tooth blade (60+ teeth) to minimise tear-out on the face veneer.
Why does my cut drift even when I am using a guide?
The most likely cause is that the guide is not clamped tightly enough and shifts slightly during the cut. Check that both clamps are fully tightened and that the guide does not move when you push against it by hand. The second most likely cause is that the base plate is not staying flush against the guide — check that nothing is catching on the guide edge as you move through the cut.
What is kerf and why does it matter for straight cuts?
Kerf is the width of material removed by the blade — typically 2mm to 3mm for most circular saw blades. When positioning your guide you need to account for which side of your cut line the kerf falls on. The blade should cut through the waste side of the line so the kerf is removed from the waste piece, not from your finished dimension. Mark your cut line, then position the guide so the blade cuts on the waste side of the pencil line.
Is a track saw better than a circular saw with a guide rail?
A track saw is essentially a circular saw specifically designed for guide rail use — it has a groove in the base plate that locks precisely onto a compatible guide rail. Track saws are more accurate out of the box and faster to set up repeatedly than a circular saw with a clamped straight edge. For occasional cuts a clamped guide works fine. For frequent sheet material cutting a track saw system is worth the investment.
How do I cut a long sheet of plywood by myself?
The best approach solo is to lay the sheet on a piece of 50mm foam insulation on the floor and cut through both the sheet and the foam. The foam supports the entire sheet including both sides of the cut, preventing blade binding. Mark your line, set up your guide, and cut — the foam absorbs the blade pass cleanly without damage to the floor or blade. This is the method most professional carpenters use for breaking down full sheets without an assistant.